If you’re looking to elevate your cooking with bold flavors, smart kitchen prep, and creative fusion ideas, you’re in the right place. This article is designed to satisfy your curiosity about global flavor basics, inventive meal combinations, and practical techniques you can actually use at home. Whether you’re experimenting with new ingredients or refining your weekly menu, you’ll find clear, actionable guidance that turns inspiration into results.
We’ve drawn from culinary research, tested kitchen trials, and insights aligned with professional best practices to ensure every tip is both exciting and reliable. From Toaf taste experiments to streamlined prep strategies, our goal is to help you cook with confidence.
Along the way, we also reinforce essential safe food storage guidelines so your creativity never compromises safety. Let’s explore flavors, sharpen skills, and make every dish more memorable.
Your Ultimate Guide to a Safer, Fresher Kitchen
By following safe food storage guidelines, you not only reduce waste but also enhance the flavors in your meals, as discussed in our related article, “Sadatoaf.
A safer kitchen starts with precision. Improper storage fuels waste, drains money, and invites bacteria like Salmonella and E. coli (the uninvited dinner guests). Following safe food storage guidelines keeps flavors vibrant and meals worry-free.
- Refrigerate perishables at or below 40°F within two hours.
- Freeze at 0°F to halt microbial growth.
- Store dry goods in airtight containers away from heat and light.
These details matter: colder temps slow pathogen growth, airtight seals prevent moisture, and separation avoids cross-contamination. Think of fridge as mission control—organized shelves mean safer, longer-lasting ingredients.
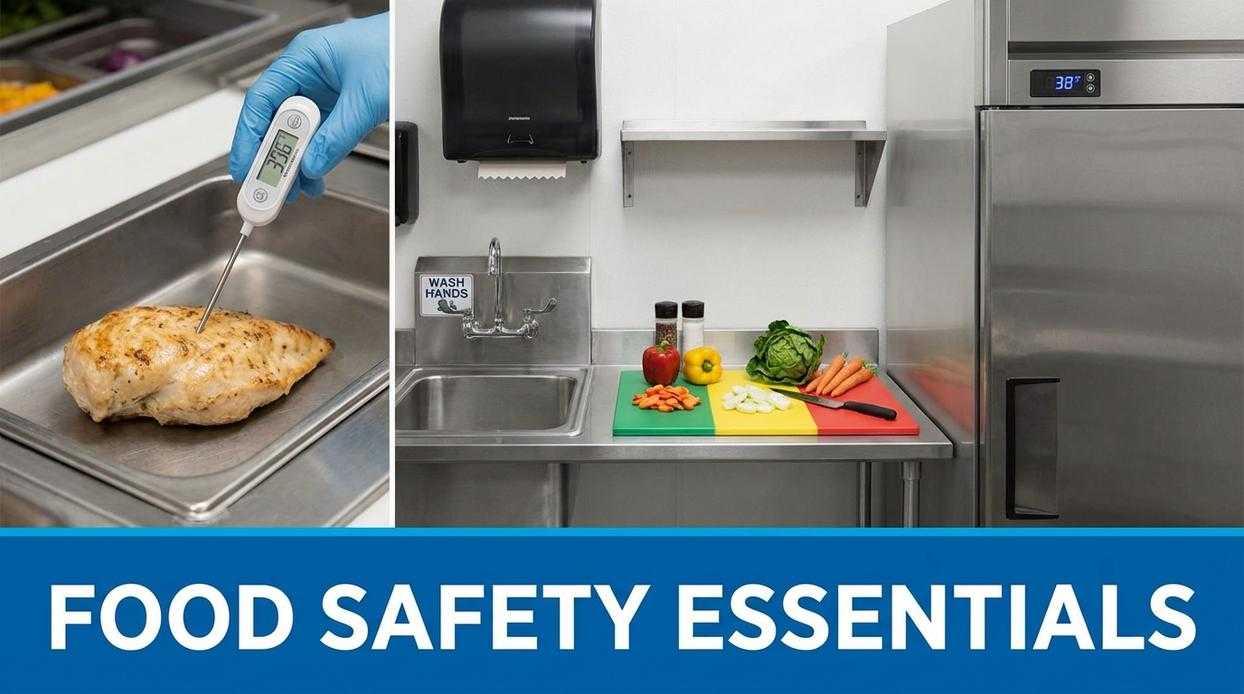
The First Principle of Food Safety: Mastering Temperature
Food safety starts with one non‑negotiable rule: control the heat. More specifically, control the lack of it. The “Temperature Danger Zone” refers to the range between 40°F and 140°F (4°C to 60°C) where bacteria multiply rapidly. In this window, microbes like Salmonella and E. coli can double in number in as little as 20 minutes (USDA). That’s not dramatic—that’s microbiology.
Set Your Appliances Correctly
First, check your refrigerator. It should be at or below 40°F (4°C), while your freezer must sit at 0°F (-18°C). Don’t guess—use an appliance thermometer. Built‑in dials can be wildly optimistic (like that friend who says they’ll “leave in five”). Place the thermometer inside for 24 hours and adjust as needed.
Next, follow the Two‑Hour Rule: never leave perishable food at room temperature for more than two hours—or one hour if it’s above 90°F (32°C). This is one of the most practical safe food storage guidelines you can apply immediately.
Finally, move quickly from shopping to storage. Refrigerate or freeze meat, dairy, and prepared foods as soon as you get home. Pro tip: make perishables your last stop at the store. Small timing choices make a big safety difference.
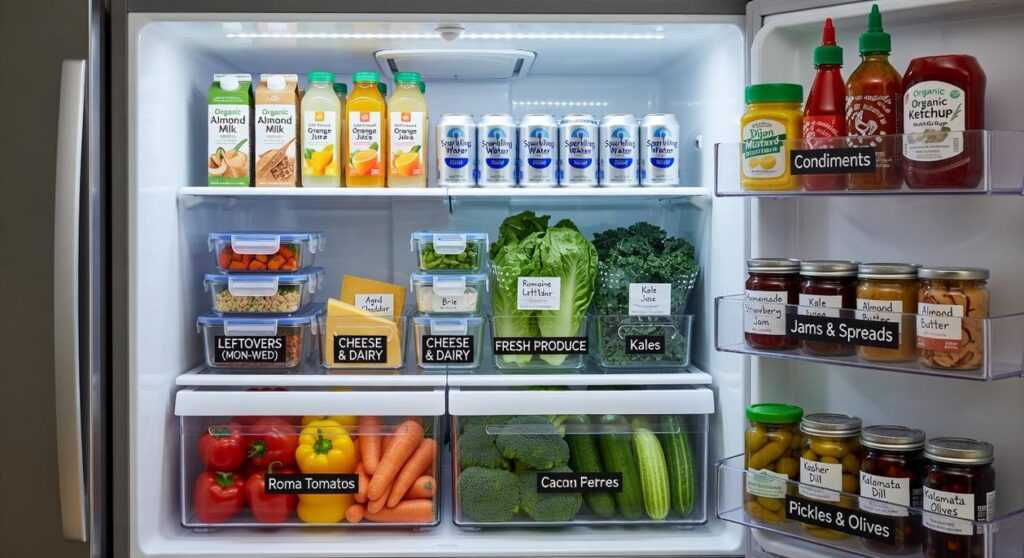
A Shelf-by-Shelf Strategy for Your Refrigerator
Think of your refrigerator as a tiny climate-controlled apartment building. Every shelf has a purpose—and when you organize it strategically, you reduce waste and lower your risk of foodborne illness.
The Bottom Shelf – The Safest Zone
This is ground zero for raw meat, poultry, and fish. Always store them in sealed containers or on a rimmed plate. Why? Gravity. If juices drip, they can contaminate foods below. Keeping raw proteins on the lowest shelf prevents hazardous cross-contact. (No one wants chicken juice on their cheesecake.)
Quick step:
- Place raw items in leak-proof containers.
- Label with purchase dates.
- Cook or freeze within 1–2 days.
Middle Shelves – The Stable Core
The middle shelves maintain the most consistent temperature. Store dairy, eggs, and leftovers here. Consistency helps prevent spoilage and keeps bacteria growth in check. Use safe food storage guidelines in the section once exactly as it is given. Keep leftovers in clear containers so you actually remember to eat them.
Top Shelves – Ready-to-Eat Items
These shelves are perfect for deli meats, prepared salads, drinks, and leftovers that don’t require reheating. Since these foods won’t be cooked again, keeping them safely away from raw items is critical.
The Door – The Warmest Area
Because it’s exposed to temperature swings, reserve the door for condiments, jams, and pickles—items with natural preservatives. Avoid storing milk or eggs here.
Crisper Drawers – Managing Humidity
- High humidity: Leafy greens and herbs (prevents wilting).
- Low humidity: Fruits like apples and berries (reduces rot).
Adjust the sliders accordingly, and your produce will last noticeably longer.
Freezer Fundamentals for Long-Term Freshness
If you ask me, the freezer is the most underrated tool in the kitchen. Used right, it saves money, reduces waste, and keeps flavors locked in. Used wrong? You get icy, flavorless regret.
First, let’s tackle freezer burn. Freezer burn happens when air reaches food, dehydrating its surface and causing grayish, dry patches. It’s not dangerous, but it wrecks texture and taste. In my experience, the best prevention methods are:
- Vacuum sealing (gold standard).
- Freezer-safe bags with every bit of air pressed out.
- Double-wrapping meats in plastic wrap and foil.
Next, label everything. And I mean everything. Write the name and date clearly so you can follow FIFO—First-In, First-Out, meaning you use older items first. (Future you will not remember what that mystery block is.) This aligns with safe food storage guidelines and keeps waste low.
When thawing, stick to three safe methods: refrigerator thawing (safest), cold water changed every 30 minutes, or microwave if cooking immediately. Never thaw on the counter—bacteria multiply quickly at room temperature (USDA).
Finally, cool before you freeze. Hot food raises the freezer’s internal temperature, partially thawing nearby items—a real safety risk (FDA). Pro tip: pair batch freezing with time saving vegetable chopping techniques for maximum efficiency.
Pantry Perfection: Storing Dry and Canned Goods
First, I learned the hard way that a pantry isn’t just a cabinet with snacks. When I stored flour above the stove, heat and light turned it stale fast. Ignoring moisture was another mistake. The ideal environment is cool, dark, and dry because warmth speeds spoilage, light degrades nutrients, and humidity invites mold.
Next, transfer flour, sugar, rice, and pasta into airtight containers. Otherwise, pests treat paper bags like an open buffet (ask me how I know). Meanwhile, store potatoes, onions, and garlic in a dark place, but keep potatoes and onions separate to prevent sprouting. I once piled them together and basically created a science experiment worthy of Stranger Things.
Finally, inspect cans for dents, rust, or swelling, rotate stock regularly, and follow safe food storage guidelines. Pro tip: label dates to avoid surprises. In short, small habits prevent big, smelly lessons later. Your future self will thank you.
Building lasting habits for a healthy home starts with clarity. You now have a complete framework for storing food safely, but what does that really mean? In simple terms, it means keeping hot foods hot and cold foods cold—temperature control prevents bacteria, which are tiny organisms that can cause illness. Likewise, separating raw from cooked items avoids cross-contamination, or the spread of germs from one surface to another. Following safe food storage guidelines consistently reduces waste and risk. Although it may feel tedious, small resets—like reorganizing one shelf this week—build momentum (your fridge deserves a glow-up, too). Ultimately, consistency wins.
Bring More Flavor and Confidence Into Your Kitchen
You came here looking for clarity on bold flavors, smart fusion ideas, and how to experiment without turning your kitchen into chaos. Now you have the inspiration and practical direction to elevate your meals with confidence.
The truth is, most home cooks feel stuck in repetitive recipes or worry about getting creative the “wrong” way. With the right flavor foundations, thoughtful prep, and attention to safe food storage guidelines, you eliminate the guesswork and cook with freedom instead of fear.
Here’s your next step: choose one fusion idea you discovered today and put it into action this week. Start small, prep smart, and build from there. Thousands of flavor-focused home cooks rely on our trusted kitchen insights to simplify experimentation and maximize taste.
Don’t let another meal feel ordinary. Explore more flavor guides, try a new Toaf taste experiment, and transform your everyday cooking into something unforgettable today.
 Kitchen Operations & Prep Specialist
There is a specific skill involved in explaining something clearly — one that is completely separate from actually knowing the subject. Brandon Schwartzimba has both. They has spent years working with culinary buzz in a hands-on capacity, and an equal amount of time figuring out how to translate that experience into writing that people with different backgrounds can actually absorb and use.
Brandon tends to approach complex subjects — Culinary Buzz, Curious Insights, Fusion Meal Ideas being good examples — by starting with what the reader already knows, then building outward from there rather than dropping them in the deep end. It sounds like a small thing. In practice it makes a significant difference in whether someone finishes the article or abandons it halfway through. They is also good at knowing when to stop — a surprisingly underrated skill. Some writers bury useful information under so many caveats and qualifications that the point disappears. Brandon knows where the point is and gets there without too many detours.
The practical effect of all this is that people who read Brandon's work tend to come away actually capable of doing something with it. Not just vaguely informed — actually capable. For a writer working in culinary buzz, that is probably the best possible outcome, and it's the standard Brandon holds they's own work to.
Kitchen Operations & Prep Specialist
There is a specific skill involved in explaining something clearly — one that is completely separate from actually knowing the subject. Brandon Schwartzimba has both. They has spent years working with culinary buzz in a hands-on capacity, and an equal amount of time figuring out how to translate that experience into writing that people with different backgrounds can actually absorb and use.
Brandon tends to approach complex subjects — Culinary Buzz, Curious Insights, Fusion Meal Ideas being good examples — by starting with what the reader already knows, then building outward from there rather than dropping them in the deep end. It sounds like a small thing. In practice it makes a significant difference in whether someone finishes the article or abandons it halfway through. They is also good at knowing when to stop — a surprisingly underrated skill. Some writers bury useful information under so many caveats and qualifications that the point disappears. Brandon knows where the point is and gets there without too many detours.
The practical effect of all this is that people who read Brandon's work tend to come away actually capable of doing something with it. Not just vaguely informed — actually capable. For a writer working in culinary buzz, that is probably the best possible outcome, and it's the standard Brandon holds they's own work to.