I’m Randolph. I like to keep things simple and straightforward. You probably have questions, and I aim to answer them without any fuss. Let’s dive in.
From Floury Mess to Flawless Bakes: Your Journey Starts Here
The Scope: This is a practical guide to mastering the foundational baking techniques that separate good results from great ones.
The Problem: Many home cooks feel frustrated when recipes fail, often due to small, misunderstood technical details, not a lack of effort. It’s frustrating, right?
Why Trust This Guide: We break down the ‘why’ behind the ‘what,’ providing clear, science-backed explanations without jargon, focusing on skills you can apply to any recipe.
Search Intent Alignment: You’ll leave this guide with the core knowledge and confidence to tackle new recipes, troubleshoot problems, and achieve consistently delicious results.
What sets us apart? We dive deep into the Baking Infoguide Fhthrecipe—a resource that covers the nitty-gritty details often overlooked by other guides. We explain why certain steps are crucial, like the role of room temperature ingredients or the importance of proper mixing techniques. By understanding these principles, you’ll be equipped to handle any baking challenge that comes your way.
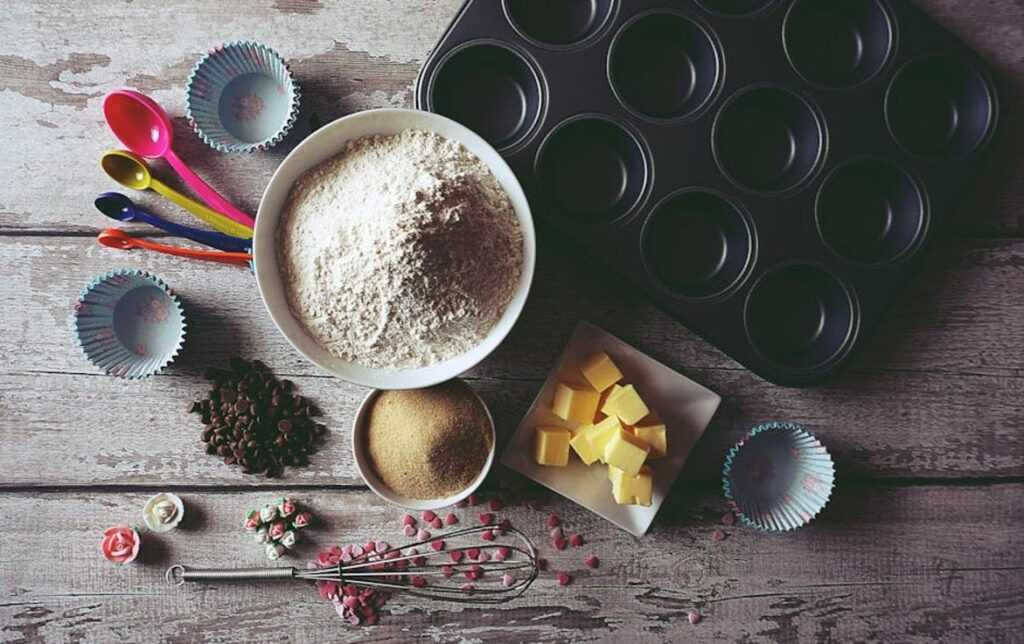
The Baker’s Trinity: Mastering Measuring, Mixing, and Temperature
Precision is key in baking. A digital kitchen scale is your best friend for accuracy with flour, sugar, and liquids. Weight measurements are more precise than volume. This can make a big difference in how your baked goods turn out.
Mixing techniques are crucial too. Creaming is used for cakes and cookies. It involves beating butter and sugar until light and fluffy. Folding is for delicate foams like meringues. You gently mix to keep the air bubbles intact. Cutting In is for flaky pastries and scones. Here, you blend cold butter into dry ingredients to create small, pea-sized pieces of fat.
Temperature matters more than you think. Room temperature ingredients, like butter and eggs, mix better and create a smoother batter. Proper oven preheating ensures predictable outcomes. A cold oven can lead to uneven baking.
Kitchen Prep Tip: Use Mise en Place (everything in its place). This professional technique means preparing all your ingredients and tools before you start. It makes the baking process smooth and stress-free.
For more detailed guidance, check out the baking infoguide fhthrecipe. It’s a great resource to help you master these essential skills.
Your First Recipe: The Perfect Brown Butter Chocolate Chunk Cookies

Why This Recipe: It’s a classic that perfectly utilizes the techniques of precise measuring, the creaming method, and temperature control. But here’s the thing—most people think brown butter cookies are just a fancy twist on a regular cookie. Wrong. They’re a whole different beast, and they deserve your attention.
Step-by-Step Instructions:
- Browning the Butter: Start by browning 1 cup (2 sticks) of unsalted butter in a saucepan over medium heat. Stir constantly until it turns a rich amber color and smells nutty. This is where temperature control comes into play. Don’t let it burn!
- Cooling the Butter: Pour the browned butter into a heatproof bowl and let it cool to room temperature. Patience is key here.
- Creaming the Butter and Sugars: Now, cream your browned butter and sugars (1/2 cup granulated sugar and 1/2 cup brown sugar) until light and fluffy. This step is crucial for the texture. The creaming method is what gives these cookies their perfect chewiness.
- Adding the Eggs and Vanilla: Add 2 eggs, one at a time, mixing well after each addition. Stir in 2 teaspoons of vanilla extract. Simple, but important.
- Mixing Dry Ingredients: In a separate bowl, whisk together 2 1/4 cups all-purpose flour, 1 teaspoon baking soda, and 1/2 teaspoon salt. Gradually add this to the butter mixture, mixing until just combined.
- Folding in the Chocolate: Fold in 2 cups of chopped dark chocolate or chocolate chunks. Precise measuring ensures you get the right balance of dough and chocolate.
- Chilling the Dough: Chill the dough in the refrigerator for at least 30 minutes. This step is often skipped, but it makes a huge difference in the final texture.
- Baking the Cookies: Preheat your oven to 375°F (190°C). Scoop the dough onto a lined baking sheet, spacing them about 2 inches apart. Bake for 10-12 minutes, or until the edges are golden. Let them cool on the baking sheet for a few minutes before transferring to a wire rack.
Technique Tie-in:
- Temperature Control: Browning the butter and cooling it to room temperature.
- Creaming Method: Creaming the browned butter and sugars.
- Precise Measuring: Adding the dry ingredients and folding in the chocolate.
Global Flavor Twist:
- Cardamom: Add a pinch of cardamom with the dry ingredients for a subtle, aromatic touch.
- Flaky Sea Salt: Sprinkle a bit of flaky sea salt on top of the cookies before baking for a modern, elevated taste.
Pro Tip: Use high-quality chocolate for the best flavor. Trust me, it makes a difference.
Baking Infoguide Fhthrecipe can help you master these techniques and more. Happy baking!
Beyond the Basics: Understanding Leaveners and Hydration
The Science of Rise: A simple breakdown of chemical leaveners (baking soda vs. baking powder) and when to use each one.
Baking soda and baking powder—two kitchen staples that can make or break your baked goods. Baking soda is a single-ingredient leavener, sodium bicarbonate, which needs an acid and moisture to activate. Baking powder, on the other hand, is a mix of baking soda and cream of tartar (an acid), so it’s ready to go with just the addition of liquid. Use baking soda for recipes with acidic ingredients like buttermilk or yogurt, and baking powder for everything else. Simple, right?
What is Hydration?: Introduce the concept of baker’s percentages and how the ratio of water to flour dramatically affects dough, from stiff pasta dough to wet ciabatta.
Hydration is all about the water-to-flour ratio in your dough. It’s measured in baker’s percentages, where the flour weight is always 100%. For example, a 60% hydration dough means you have 60 grams of water for every 100 grams of flour. This ratio makes a big difference. Stiff pasta dough might be around 30% hydration, while a wet ciabatta can go up to 80% or more. The higher the hydration, the more open and airy the crumb will be.
Practical Application: Provide a simple ‘no-knead’ bread recipe concept to demonstrate how high hydration and time can do the work for you.
Let’s put this into practice with a no-knead bread. Mix 500 grams of flour, 400 grams of water, 10 grams of salt, and a pinch of yeast. Combine until it forms a shaggy mass, cover, and let it rest overnight. The next day, shape and bake. The high hydration and long fermentation time do the kneading for you, resulting in a beautifully textured loaf.
Taste Experiment: Encourage readers to see how a small change in hydration can alter the crumb and crust of a simple loaf.
Try this: Make two loaves using the same recipe, but adjust the hydration slightly. One at 70%, the other at 75%. Bake them side by side and compare. You’ll notice a difference in the crumb and crust. It’s a fun way to see how a little extra water can transform your bread.
For more detailed guidance and recipes, check out the Baking Infoguide Fhthrecipe. It’s a treasure trove of tips and tricks to help you perfect your baking skills.
Solving Common Baking Disasters: A Troubleshooting Guide
Baking can be a joy, but it’s easy to run into problems. Here’s how to fix some of the most common issues:
Problem: My Cookies Spread Too Much.
Solution: Chilling the dough, checking your oven temperature, and using less butter can help. Cold dough holds its shape better, and the right amount of butter prevents excess spreading.
Problem: My Cake is Dry and Crumbly.
Solution: Over-mixing after adding flour, incorrect oven temperature, or not measuring liquids properly can cause this. Mix just until the ingredients are combined, and use a kitchen scale for precise measurements.
Problem: My Bread is Dense and Heavy.
Solution: Under-proofing, old yeast, or not developing enough gluten can lead to dense bread. Make sure your yeast is fresh and give your dough enough time to rise.
The Golden Rule of Troubleshooting: Change only one variable at a time. This helps you pinpoint the exact issue and make the right adjustments for your next bake.
Understanding these solutions can turn your baking from frustrating to fantastic. You’ll save time, reduce waste, and enjoy delicious results. Plus, having a solid grasp on these basics will boost your confidence in the kitchen.
For more detailed guidance, check out the Baking Infoguide Fhthrecipe. It’s packed with tips and tricks to help you master your baking skills. And if you need to brush up on reading recipes, this guide is a great place to start.
Your Oven is Preheated: Putting Your New Skills to Work
You now understand that consistent baking success comes from mastering fundamental techniques, not just following a recipe. No more guesswork or disappointing results.
“Baking is all about precision and understanding the science behind it,” said one of my baking mentors. “Once you get that, the rest falls into place.”
By focusing on precision, temperature, and proper mixing, you have the framework to bake with confidence. Here’s a quick reference to help you:
| Technique | Why It Matters |
|———–|—————-|
| Precision | Consistent results |
| Temperature | Even baking |
| Proper Mixing | Texture and structure |
Start with the brown butter cookie recipe in the Baking Infoguide Fhthrecipe. Then, try applying the hydration principles to a simple loaf. Your baking journey has officially begun.
Baking Infoguide Fhthrecipe
Diving into the world of baking can be both exciting and a bit daunting, especially with so many recipes and techniques to explore. Whether you’re a beginner or looking to refine your skills, this guide is here to help you navigate through the basics and beyond.
Essential Baking Tools
Before you start, it’s important to have the right tools. Here’s a list of essential items every baker should have in their kitchen:
- Measuring Cups and Spoons: Accuracy is key in baking.
- Mixing Bowls: Various sizes for different tasks.
- Whisk and Spatulas: For mixing and folding ingredients.
- Scales: For precise measurements, especially when baking by weight.
- Oven Thermometer: To ensure your oven is at the correct temperature.
- Baking Pans and Trays: Different shapes and sizes for various baked goods.
Basic Ingredients
Understanding the role of each ingredient is crucial. Here are some basics:
- Flour: The foundation of most baked goods, providing structure.
- Sugar: Adds sweetness and helps in browning and texture.
- Butter and Oils: Contribute to flavor and texture.
- Eggs: Bind ingredients and add richness.
- Leavening Agents (Yeast, Baking Powder, Baking Soda): Help doughs and batters rise.
- Salt: Enhances flavors and controls yeast growth.
Key Techniques
Mastering a few fundamental techniques will greatly improve your baking:
- Creaming: Mixing butter and sugar until light and fluffy, used in cakes and cookies.
- Folding: Gently combining mixtures to maintain airiness, often used with egg whites or whipped cream.
- Kneading: Working dough to develop gluten, essential for bread.
- Blind Baking: Pre-baking crusts before adding fillings, common in pies and tarts.
Troubleshooting Common Issues
Even experienced bakers run into problems. Here are some common issues and how to fix them:
- Cake is too dry: Check your measurements and make sure not to overbake.
- Cookies spread too much: Chill the dough before baking and use room temperature butter.
- Bread doesn’t rise: Ensure your yeast is active and the environment is warm enough.
Baking Tips for Success
- Read the Recipe Thoroughly: Before starting, read the recipe from start to finish to understand the steps and timing.
- Prep Ahead: Measure and prepare all ingredients before you begin.
- Use Room Temperature Ingredients: This helps in better incorporation and even baking.
- Follow the Timing Closely: Baking times can be critical, so set a timer and keep an eye on your baked goods.
- Practice Patience: Baking is a science; sometimes, it takes a few tries to get it right.